
Purple Martin Pages
![]() Requirements for martins
Requirements for martins
![]() The Martin Bio
Page
The Martin Bio
Page![]() The Habits
Page
The Habits
Page![]() Tips to
Attract Them
Tips to
Attract Them
![]() Nest
Checks
Nest
Checks
![]() T-14
Mounting
T-14
Mounting![]() Purple Martin
Housing
Purple Martin
Housing
Purple Martin Housing
This is probably one of the most important sections to the hobby, what type of housing do we want to use for our martins? There are a large number of choices to pick from and in reality, it's our own personal preference as to what type to use. There's commercially manufactured houses of all sorts to choose from. Aluminum houses, plastic houses, wooden houses and both plastic and natural gourds. Below, we'll investigate each in detail so that a newcomer to the hobby can make an informed decision as to what type he or she would like to use. For the most part, it will be assumed that we are starting out with nothing and creating a site from scratch. However, if you already have an established site that doesn't match these specifications or maybe you're thinking about making a change, then by all means, read on and see if there's something here that catches your eye. I would then suggest your making the update at the earliest possible opportunity, or at least before the return of the martins.
First, let's look at a few things before we start digging holes and erecting poles for our houses.
Now that you've made the decision to start a colony, you want to do it in such a way that you'll enjoy what you're doing and there are a number of factors that have to be thought out before we begin.
First, be forewarned. We are dealing with nature and wild creatures, therefore, you 'will' be bothered by pests and predators. You 'will' have to get at the housing to remove the pests and clean out their nests
Second, you 'should' perform nest checks. Recent studies have shown that they have become a very important part of keeping martins.
And third, there is always some general maintenance that's required from time to time. If you have to climb ladders or work with difficult housing to do these things, then it won't be any fun and therefore, you won't enjoy yourself or the hobby. Hobbies are supposed to be fun, that's why we do them.
Regardless of what type of housing you desire, it should be easily accessible. You want to be able to easily perform your maintenance. This one point is very important in making the hobby enjoyable. Your housing should be easily accessible by vertically raising and lowering on a pole. This can be either a pulley system or a telescoping pole system depending on the type of housing you have. This makes maintenance very quick and easy, something that is desirable when the martins are in the site. Going out of your way to properly erect your site to begin with will make life a lot easier and more enjoyable for you in future years. If you presently have an established site that doesn't have these features, then you should by all means, update your equipment so that it does.
Also, NEVER use housing that TILTS on a pole to gain access to the house. This could damage the eggs or harm the young when the unit is tilted to get into them.
Second decision... what type of housing to use?
Now the decision has to be made as to what type of housing to use. Each has its own merits, but we as humans all see things differently, so the type of housing to be used is of our own accord. The reason you need to decide on the type of housing first is it's a factor in choosing the type of pole you'll be using. If it's not a telescoping pole, then you'll need a pulley system of some sort for the top of the pole you'll be erecting. Ask yourself these questions.
Is the housing light or heavy?
Will I need a winch or will a simple rope and pulley system work?
Each has a different mechanism to lift it and this needs to be decided first.
Sturdiness
I am a strong advocate of using steel poles that are plenty strong enough to handle the housing I use. I also strongly recommend using ground sockets to hold these metal poles in place. That way, should anything ever go wrong, the main pole can always be lifted out of the ground socket, repaired and then replaced in the ground socket. Most people just dig a hole and bury the pipe right in the concrete and that's not the way to do it. Once set up, they have all kinds of difficulty getting to the top of their poles when anything goes wrong whereas, had they used a ground socket to begin with, all they would have to do is lift the pole out, fix the problem and then return it to the socket.
Without going into a lot of the technical garb, the pipes I use are 1-1/2" welded steel pipe. (1.900" O.D., 1.610" I.D., schedule 40. The schedule 40 refers to the wall thickness of the pipe). These usually come in 18 to 20 foot lengths and you can either have it cut to the length you desire or you could even cut it yourself. Without going thru all the calculations here, mine have gone thru 50 mile an hour winds without any ill effect on them at all. I get them home and lay them on a couple of saw horses and easily work them to what I want.
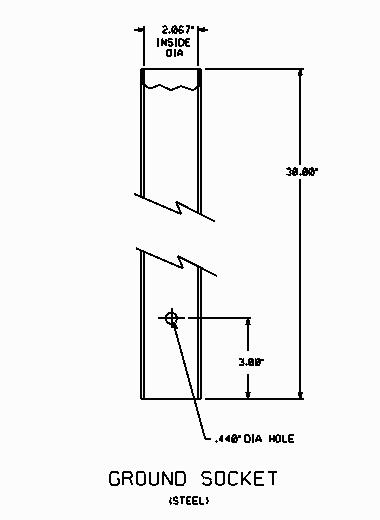
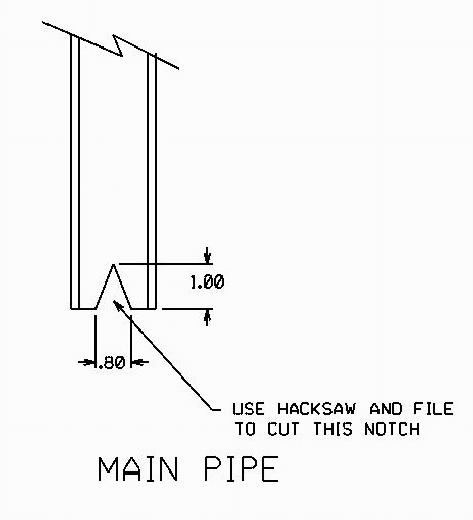
While I'm at the pipe store, I also get me a 30 inch long piece of ground socket. The ground socket is nothing more than a 30" long piece of 2" welded steel pipe. (2.375" O.D., 2.067" I.D., schedule 40). The main pipe easily fits down into this pipe and makes for easy removal should it ever be required.
The only thing you need to do on the ground socket is drill a clearance hole for a 3/8" diameter bolt 3" up from the bottom. A 7/16" (.440") hole will do just fine. Then, put a 3/8 x 2 1/2" long bolt through it and put a nut on it. This bolt is what the main pipe sits on when in place. Nothing special has to be done to it because the ground socket is going to be concreted in place and the bolt will never come out. The main pole has a " V " notch cut in the bottom of it so it will sit down over the bolt and the notch prevents any twisting of the main pole. Hopefully the pictures below will describe all this clearly.
Third decision... Where to place the place the pole?
Now comes a very important decision. Where to place your pole? This should be given a considerable amount of thought because of all the rules that need to be followed to attract martins. If you're not already familiar with the tips to attract martins, then please read them first before digging any holes. Then, make your decision.
Some Tips to attract Purple Martins
Once you decide where you want your housing to be located, using post hole diggers or a small shovel, dig a hole just deep enough so that the top of the ground socked is level with the ground. I like to dig mine a little deeper and then add a couple inches of crushed stone in the bottom. This allows any rain that might accumulate to drain away. It also allows me to adjust the height of my ground socket to the correct height by either adding or removing stones. Once the socket is positioned correctly, fill the hole to within 3" of the top with dry Sacrete, (or any concrete mix) making sure the socket is straight up and down. I only fill mine to within 3" of the top because I then put dirt on top of it so the grass will grow around my socket. Then, leave it set for a day. The moisture from the ground hardens the concrete quickly and is just as strong were it poured in wet.
One reason for having the top of the ground socket level with the ground is that, if you ever decide to change locations, all you have to do is make another ground socket and bury it. The old one can stay where it is and no one will ever know. It's much more work to dig up an old ground socket than to build a new one and the cost for a new one isn't that much.
Also, if you take your housing down for the off seasons, you can mow and rake and do any lawn work without a pole sticking up out of the ground. Just don't lose track of it. Grass can quickly grow over one and it makes it pretty hard to find each spring.
Housing type
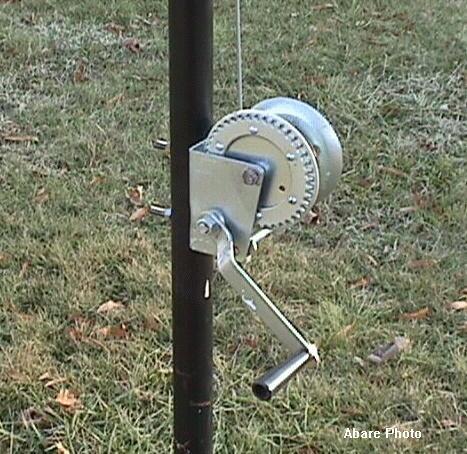
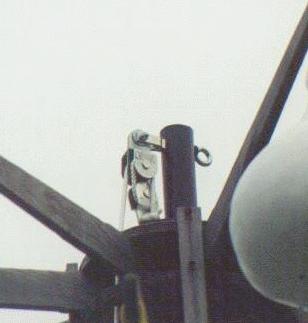
Since you've already decided the type of housing you're going to use, the top of the pipe has to be worked accordingly. If you decided on heavy housing and require a winch, the following picture will show you one idea of how to add a pulley at the top of your pipe for use with a winch. The pulley is sandwiched between two safety bracket that are attached to the pipe. This will give you the best forces on your cable. The straps over the top of the pole acts as a safety strap. Should your cable come out of the pulley groove for any reason, the strap prevents it from falling off the pipe and allowing your house to come down on you. Remember, we need to be safe as well as have fun. Also, remember, NEVER use a ROPE with any kind of WINCH. Ropes just aren't strong enough to use with winches and will break easily. Always use a steel cable made to fit the winch.
Of course, in order to use this with heavy housing, you'll have to also add a winch to your pipe. The house has to have a hole in the middle of it for the pipe and cables to pass through it. The cable hooks to the winch, passes up over the pulley in the pipe and then goes back down to the house and is secured there. Then, when you crank on the winch, the house is moved up the pole.
Weight...
If you weigh your house when it's empty, you can add another pound for each compartment. Some houses could increase by 20% to 30% to their original weight and those numbers are a good approximation as to what you'll be dealing with when it's full. Most people forget that weight increases when the housing becomes occupied. That cute little aluminum house that is so light according to the manufacturer suddenly becomes a lot heavier than you remember it being in the store. All the extra weight of the martins and their nesting materials have to be considered. This is one reason telescoping poles become difficult to work with, and especially for someone who is slight in stature, this could become a problem.
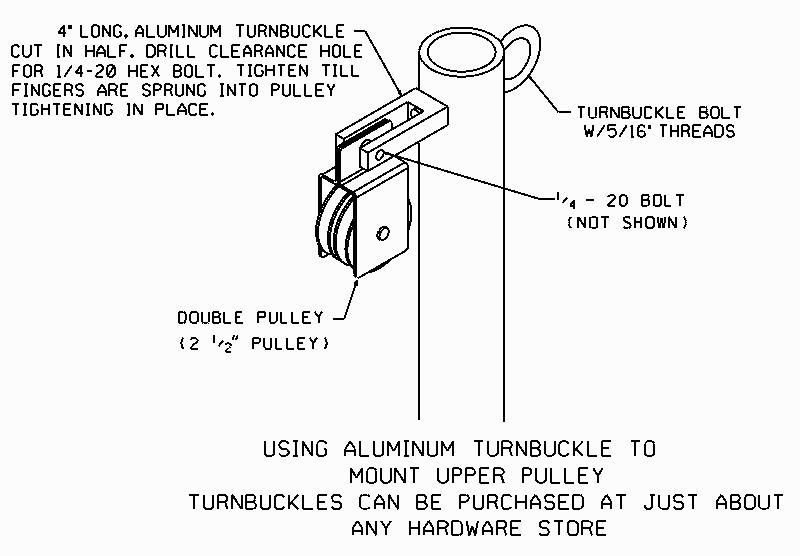
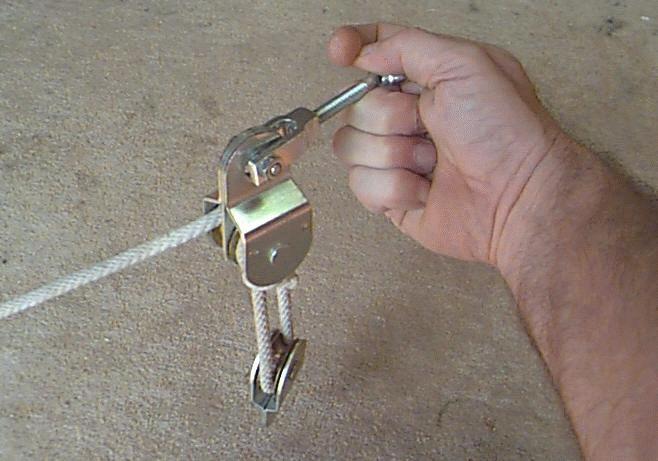
Now, let's look at a drawing of a pulley system that will lift things like gourd racks and lighter houses. This is a simple design to make and I use this system on my racks and it works very well.
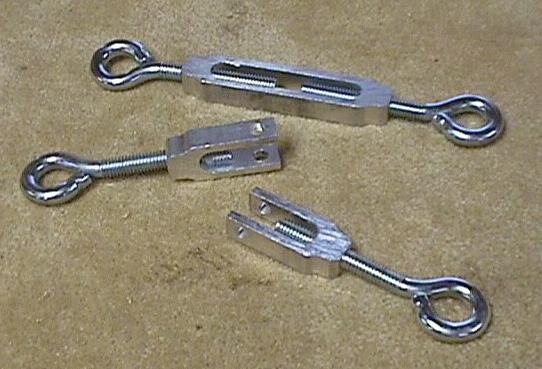
All I do is buy a 4 inch aluminum turnbuckle, (3/8" threads), cut it in half, drill a clearance hole for a 1/4 - 20 bolt.
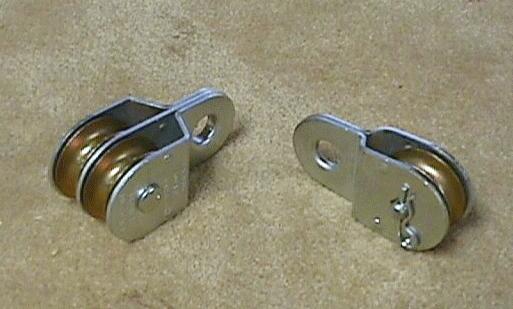
Then, I purchase a couple of good strong pulleys. These are distributed by National.
I then put the pulley in the yoke of the 1/2 turnbuckle with the 1/4 - 20 bolt as shown above.
I drill a clearance hole for a 7/16 inch bolt in the top of the pipe and pass the end of the turnbuckle through the hole and screw the turnbuckle into place. It really works good and is plenty strong enough to hole a full rack of 24 gourds. I use a 5/16" diameter braided rope which I get at K-mart to go with the system. The larger the rope, the easier it is to handle, especially if you have older and larger hands like I do. And of course, the larger rope makes the entire system more secure.
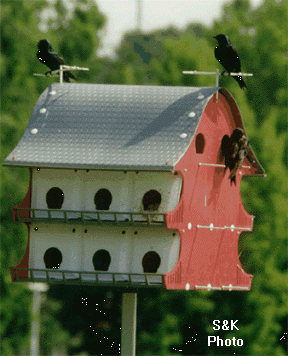
Aluminum Housing
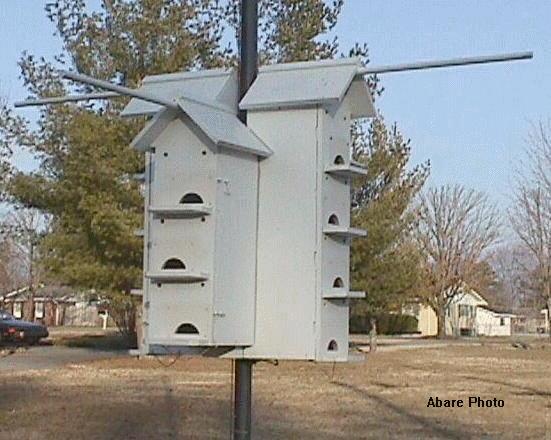
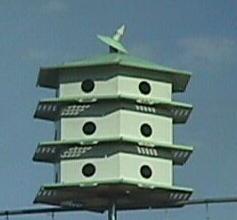
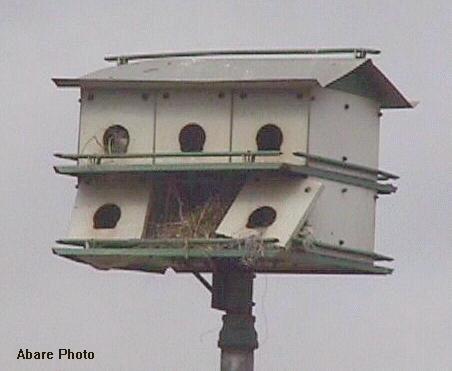
Probably one of the first encounters we have with aluminum martin houses is when we run across them in a store or see them setting on top of poles in other people's back yards as we drive around. The average person thinks, "what cute little bird houses". Unfortunately, those thoughts are correct, "cute" and "little". Remember one thing. Most aluminum houses are made and sold by manufacturers to make money. Therefore, they are engineered to be manufactured for the least investment possible so the manufacturer can make as much profit as possible. In most cases, I don't believe the martins' best interests are fully taken into consideration since most martin houses are built with small compartments. If they were concerned about the martins, these small compartments would be enlarged to fit the birds' requirements and have more room to raise their broods. Adult purple martins are 8" long. The compartment in most of these commercial aluminum houses are only 6 x 6 x 6, a full 2 inches smaller than the adult birds. Yet, the manufacturer says that they are plenty big enough for the birds to raise a brood. I'm sorry, but I feel this is very incorrect. Although the birds will use them it's usually because there isn't anything more suitable around and 9 times out of 10, the broods only consist of 2 or 3 young, hardly enough to overcome the natural decline of the species. Recent testing has shown that in larger 6 x 6 x 12 compartments, the averages are between 4 and 6 young with 7 being very common. The better houses have the ability to remove a middle panel and make the compartments a full 6 inches deeper or are designed from the start for the larger compartments. This gives the birds much more room to raise their broods and also offers much more protection if a flying predator just happens by.
Materials
When you first pick up an aluminum house, you immediately realize how light it is. That's because the material used to make them is very thin. Also, I feel the thin material is not very strong when a flying predator such as a Great Horned Owl comes to visit. These birds are very big and strong enough to literally pull the front doors to these houses off when they want to get at the occupants inside. My own experiences were not good and I personally would not subject my martins to the dangers of being torn out of their houses by these predators. However, if an aluminum house is used, a properly designed owl guard should be installed.
Thermals
Since I work in the engineering field, I know that aluminum can dissipate heat very well. I also know that it can absorb heat from direct sun just as well. Although I have not done any tests on the subject as far as aluminum birdhouses are concerned, the experts say that it works very well. I have no first hand knowledge about them other than comments from other landlords that have them, and they say they work well if you can get the martins to nest in them.
Pests
Cost
But do they work?
Yes, they do. Martins do return to them each spring and if taken care of by the landlord, then they will be used year after year. However, many people have this thought that if they just buy the house and put it up, the martins will come and everything will be O.K. I'm afraid to say that nothing could be further from the truth. That just isn't the way it is anymore. With the introduction of the European Starling and the English House Sparrow, the landlord has to diligently defend his martin house or the following will quickly occur.
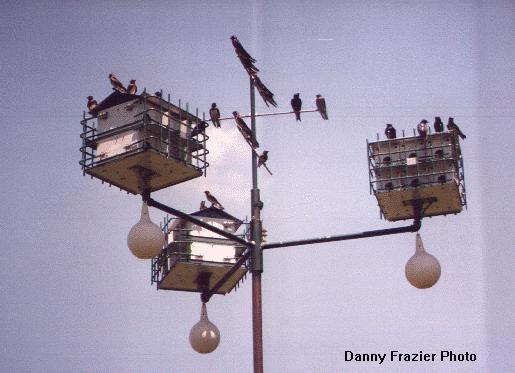
Above are the results of a house that was put on top of a pole without the ability to easily get at it. It was left to its own accord and the house sparrows and starlings quickly moved in and have now claimed it as their own. They actually pack so much nesting material into the compartments that the doors literally burst off. The cute little house quickly becomes a slum house and does nothing more than propagate the very birds we are trying to eliminate at tended martin sites. This is another reason that the housing we choose has to be easily accessible and we as landlords have to constantly defend it from these pest birds or our housing could end up looking the same as this. Unfortunately, the thin material that most of these houses are made of are one of the problems to begin with. The designs just aren't strong enough to hold the house together should an event occur.
However, below is a link to a site that has aluminum houses for sale, aluminum houses that I feel were designed by purple martin landlords with the martins best interests in mind. They are called Lone Star purple martin houses and I recommend checking them out if aluminum is what you're interested in. Yes, the houses are expensive, but if you look at all the innovations these houses have, I believe you'll find that they far out way the disadvantages that the cheaper houses have and also, if you look at it like this, it might make more sense. If you purchase one of these houses and it lasts you for years and years, you could break the cost down to a per year basis. Thus, if you have the house and it lasts you for as long as 20 years, then the initial expense doesn't seem so bad now, does it!
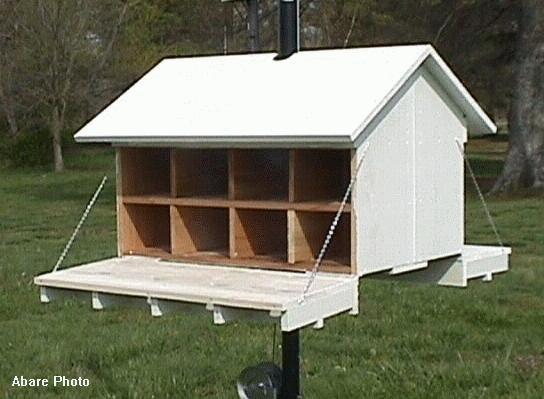
Wood Housing
I have a woodshop and I build my martin houses. I make them from Western Cedar, a very light and weather resistant wood. It is excellent for building bird houses of all kinds. Because the wood is porous, it has very good insulating properties from heat or cold, and the natural resins in the wood make it a good wood to use out in the elements. I have bird houses that I've built 10 years ago from it and they are still going strong showing very little wear.
Wooden houses are much heavier than aluminum, but they have their good features.
One, they can be built to the proper specifications that are required for adult martins. Unfortunately, most of the plans we acquire to make them are incorrect themselves and the results are houses that are not built to the proper specs. Recent testing has proven that martins need more room than the small 6 x 6 x 6 compartments that are on most plans available today. Recent testing has found that the minimum correct compartment dimensions are 6 inches high, 7 inches wide and at least 9 inches deep with 11 or 12 inches being optimum.
Two, another thing that is a must is the ability to easily access the house and it should easily raise and lower vertically on a good sturdy pole. Houses of these types are not made to work with telescoping poles. They are much too heavy.
And three, houses should have easy access to the interior by doors on the front of the house. This enables nest checks, nest removals and of course, maintenance.
Plastic Housing
Plastic houses are another form of commercial housing that is available for martins. Again, many of them have the same problems that the commercial aluminum houses have with compartments that are too small for an adult pair of martins to raise a full brood of young. Some of them now have the option of removing a center panel allowing the compartment to be made 12 full inches deep. This is good because the martins need the extra room, especially if they are backing out of the way of danger.
If you select one of these houses, check it out first and make sure that the unit is able to be reworked to the larger compartments. Also, make sure that it is accessible for nest checks. This will mean that the front of the house has to be able to be opened so that the landlord can get in to do the checks.
And one more thing. Make sure that the house either has crescent shaped entrance holes or can at least can be changed to them. They are a very important factor in the war against the European starling.
Plastic Gourds
In recent years, there have been a few innovations in plastic gourds that are changing the martin keeping hobby. Originally, there were a number of small 6" gourds that were on the market, but it was quickly discovered that these gourds were much too small to be used for martins. Unfortunately, the manufacturers of these gourds refuse to quit making them, proving that the bottom line is more important than the martins well being.
In this chapter, I would like to talk about plastic gourds whose manufacturers have realized that those little gourds were too small and began manufacturing gourds that are designed for the martins. If you think you'd like to try some plastic gourds, then please make sure you get gourds that are plenty big enough for the martins.
Today's modern plastic gourds are virtually maintenance free. Manufactured from white polyethylene, they never need painting or soaking or any of the common maintenance issues that naturals require. The are almost waterproof, sun proof and with the proper crescent entrance holes, starling proof. Let's look a little closer at a few of them.
This gourd is manufactured by Natureline. It's a full 10 inches in diameter and has three different front inserts available. The 2" round hole, the 1 3/16" oval and a blank as shown. Although not tooled up for crescents yet, a blank can be ordered and with just a little work, the crescent shaped entrance hole can be easily cut in. Since it's been shown that starlings are able to negotiate the oval holes, it's recommended that the crescents be used over all other holes.
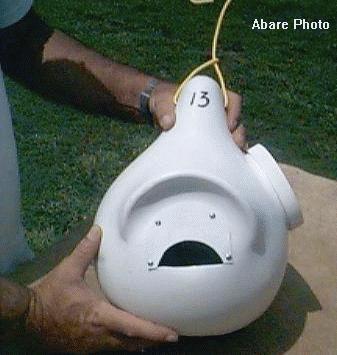
This gourd is known as the SuperGourd and is manufactured by Bird Abodes in Pennsylvania. This one has an access lid which makes it very easy to do nest checks and nest maintenance. I added the crescent insert to this one because it has a round hole, but they are now available with crescents molded right in. If these interest you, contact the PMCA
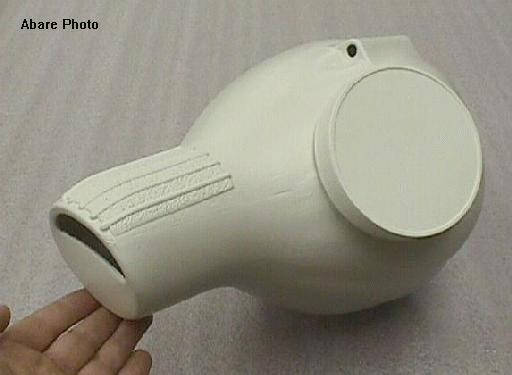
This gourd is unique in the fact that it's offered to the martins in the horizontal position. As you can see, it also has the 4" access port and it also has the crescent entrance hole molded right in. One added feature is the depth. No owl can reach to the back of this gourd to get at its occupants. This horizontal gourd is produced by:
The Bird's Paradise' 20835 Morris Rd. Conneautville, Pa, 16406 (814)-587-3879
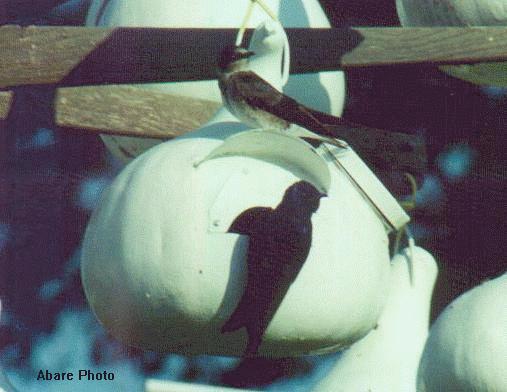
Natural Gourds
Finally, let's look at natural gourds. This is another form of housing that is widely used throughout the martin's range. They're light, they're cheap, they're just the right size and if done right, very easy to care for. If, for some reason one becomes unusable, you simply replace it. You can either paint them or leave them natural, the martins don't care, although painting them white is highly recommended and, will not only help attract the martins, but it will cut down on the heat from the summer sun. Painting will also make the gourds last longer.
Gourds can be presented to the martins in many different ways. One method is to string them on a wire stretched between two poles, but this method makes maintenance very difficult, if not impossible. Raising and lowering a gourd line requires a special mechanism and it has to be repeatable so that the gourds return to the same level every time.
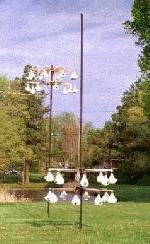
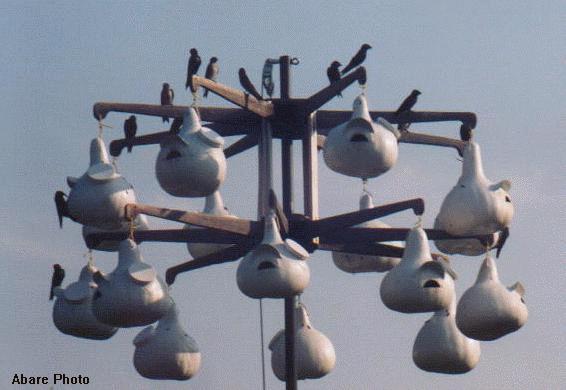
They can also be put on a metal pole with cross arms. No doubt you've seen the old hay rake times welded to the top of a pipe or even the old metal wagon wheel. Located correctly, the martins readily accept any as a nesting site as long as the gourds are of decent size. The rack you see above is my own design and, depending on how you build it, can hold anywhere from 8 to 25 gourds. I can honestly say that the martins love it. I came up with my own design for a rack because I wasn't happy with the way the others looked, plus I wanted something that was easily accessible.
Gourds were used long before houses came onto the scene
and they worked fine then and they still work just fine today. And,
just like any other outdoor item you might have, they will require
occasional maintenance, and/or replacing. Although very hard on the
outside, their inner walls are porous and therefore, do not transfer
heat very well. Also, the softer insides allow for the
martin's claws to dig into the material so they can get a good foot
hold when walking around the inside of the gourd. One other
thing, they sway in the wind and this motion is said to deter other
birds from nesting in them, but I wish someone would tell that to
the other birds. Unfortunately, that's just another of the
myths about the martin hobby that has been passed down through the
generations. Gourds can be worked to add any style entrance hole you like plus, you can even add little rain canopies and access holes for nest checks. The screw on - screw off caps stay put until you take them off and the birds don't mind them at all.
If gourds interest you, then here is a link to a page that will show you just how to work gourds so that they become 'martin magnets'.
Back to Chuck's Purple Martin
Page

|


 1999 -
All Rights Reserved
1999 -
All Rights Reserved