Gourds
to Birdhouses
If you plan to use
gourds as your choice of housing for your martins, then on this page, I'll
attempt to describe what's required to turn natural gourds into housing for
Purple Martins. Gourds can be used to house other cavity nesting birds also, and
the same general criteria will apply. Just use the proper size gourds and
entrance holes for that species along with the proper location.
It's common
knowledge that martins love a good large natural gourd to nest in. It might be the
feel or the looks, but what ever it is, they flock to them. If gourds are
going to be your preferred housing, then the following are a few tips to make
them into martin houses.
The following tools
or items will
be required to complete the project:
Obviously, you'll
need some gourds. Make sure they're nice and big, at least 9 or 10 inches
in diameter and as thick walled as you can get. The thicker the wall, the
better. General shape and looks are your own preference. The martins
don't care about their shape but some people like to use particular shapes.
You'll need a jigsaw
with a scroll cutting blade. This will allow you to cut the round curves
of the holes.
A drill with a 1/4"
and 3/8" bits, for drilling the hanging and drain holes.
A wood rasp
with one side rounded.
A plastic entrance
port with a
screw on lid that is at least 100 millimeters in diameter...
(Approximately 4"). You need to be able to get your closed fist
through the opening. (See details below).
An entrance port
with 2 porches. (Again, see details below).
Some Copper
Sulfate. Used to preserve your gourds
A large container
large enough to hold at least 5 gallons of water.
A pot scrubber of
some sort. The stainless metal ones seem to work the best.
A black marking pen
of some sort or a pencil
A paint brush.
A tube of PPCA caulking and a caulking gun.
PPCA can be purchased at just about any Lowe's, Home Depot or hardware store
Some good 'white'
latex primer and house paint.
A respiratory mask
for those that might have breathing problems.
Before you can make
your gourds into martin houses, you'll need to order the entrance assy's and
access ports. S&K Mfg has some wonderful little plastic parts that
work wonders in turning a gourd into a martin house and you will need to order
these before you begin actually working the gourds. Simply call them (1-800-764-8688) and tell them you need X amount of entrance assy's and access
ports. They'll have them in a box and shipped off to you in no time.
As you'll see further down this page, they are very easy to use and the entrance
holes are very accurate. No messing with measuring anything.
Another way of
contacting them is thru their web page. http://sk-mfg.com/
Also, another
version of an entrance hole assy that can be used like this can be found
here. All you have to do is adjust the hole you cut in the gourd to
accommodate it. http://www.entrancesbysandy.com/id29.htm
OK, on to making
martin houses from gourds.
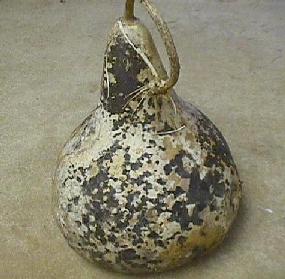
Once the gourd is
finally dry, (and some can take months to fully cure), it will require cleaning. The
outside skin will have all the residue on it that remained during the curing
process. This will range anywhere from just a light coating to something that
looks like the one shown below. Even though the gourd has a lot of this residue
on its outer skin, there is nothing wrong with it. It simply needs to be cleaned
off.
The first thing to
do is to "cut" the stem. If not already cut in the field at
harvest, using a pair of pruning shears, (or sharp utility knife), 'cut' the
stem around 1/2" long from the gourd. I like mine to be about 2 inches
long, because I like the way it looks, but the length is not important.. When adding the entrance hole, I
actually make it a point to add the hole directly under the remaining portion of
the stem. The martins sometimes sit on these stems, so leaving
them a little something to perch on is not all that bad. Never
"twist" off a stem. They are very stringy and it really doesn't
look all that great.
Now for the
cleaning. This can be done in a number of different ways.
Respiratory Note:
The dust from gourds
is very acidic and does have an effect on folks that have respiratory
problems. If you are one of these folks, it is advisable to wear a
respiratory mask so that you don't breathe in these dust particles or use an
alternative method to sanding.
If you only have a
very few gourds to do, one method of
cleaning the residue off is to sand if off. Now, I'll say this up front. I
don't like this method because if you are new to this and don't know a lot about
sanding gourds, there is a very good chance of sanding thru the outer hard
shell, and that is something you do not want to do. The outer skin of a
gourd should never be broken. However, here's how it's done anyway.
Using about a 100 grit sandpaper (or finer), you can use a
palm sander if you have one available and sand off any excess residue and again, be
careful. A power sander will quickly break the hard outer shell and as
stated, you
don't want to do this.
If you don't have a
power sander, you could simply put the
sandpaper over a small block of wood and sand away, however, this tires the arms
pretty quickly and is time consuming. A small block of Styrofoam
also works very well. It's soft and will conform to fit the curves of the gourds
better.
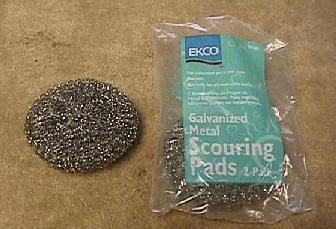
A second way to
clean gourds is a whole lot easier than
sanding. Purchase a little metal scrubber and then get a bucket of warm, soapy water. Just about everyone has old 5 gallon
buckets laying around and they will work just great for this project if you only
have a few gourds to do. However, if you have more, then a little larger
container will work better because it's nice to have a little extra
room to work. I got my scrubbers and container from Wal-Mart, but they can be found just
about anywhere. Then, using these small hand held metallic scrubbers,
simply scrub the debris
off. These can also be purchased in just about any grocery store in the kitchen
aisle and they do a wonderful job.
One tip here, let
the 'dirty' gourds sit outside for a while under a water sprinkler of some
sort. A soft rain on them for an hour or two works wonders to soften that
outer crud. No, this
will not soften the original gourd in any way. The
water softens the residue on the outside of the gourds and it easily scrubs off
with the pad. These pads work great at removing the debris and there's no gourd dust flying all over the
place for those having respiration problems. Simply set the gourd in the pan or bucket of
warm water and start
scrubbing away, turning the gourd as you go. If you have a bunch to do,
then you might also want to purchase a pair of thick rubber gloves to save on
the hands. Clean it as much as you like,
then set it aside to dry or simply towel it dry with a paper towel. Don't try and remove
every spot. Some of them are discolorations in the skin and they won't
come out and besides, you're going to paint the gourd anyway, so they don't
have to be perfect.
However,
a
third method I've found to be even easier is to use a pressure washer and
PRESSURE WASH the dirt and debris off. Yes, this works wonderfully and if
you have a lot of them to do, then you might want to consider this method.
No dust to worry about here. No tired arms or sore hands either.
Many folks have these little home pressure washers around now a days and this
method works great. I made a small, but heavy stand with two sides and a
back out of welded screen making a little open cage so to speak. If you want to make one,
it's 18" wide x 20" deep x 13" high. The wire mesh can be
anything you have around as long as the holes are big enough to let the debris
through. Although it doesn't show very well here, I lifted the front up
1" before I screwed the two front legs on. This allows the gourds to
always roll towards the back of the jig. Again, let the gourds sit
for an hour or two under a water sprinkler to soften the debris on the outsides. Then
simply place the gourd in the stand and spray away. The gourd often turns
around by itself as the spray hits it and there is seldom any extra
handling. 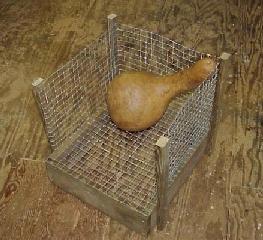
One
more caution here. You might want to wear some safety glasses and a
good rubber apron or rain coat. Yes, it can be wet with the occasional spray
bounce back, but it's so easy that it makes it all worth the while and if you're
careful, it really isn't that bad. Plus, if you do it on a warm sunny day,
it isn't bad at all and is actually kind of fun. This
is also a good way to tell if you have quality gourds with
good thick walls. If you have gourds that are thin walled, this pressure
washing method will sometimes cave them in and THIS IS GOOD, because if a gourd
can't take the force of the washing, then it wasn't of good enough quality to be a martin
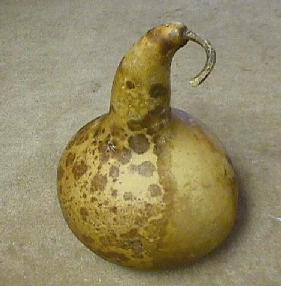
gourd in the first place. I wash a lot of them and this has obviously become my preferred method. The gourd shown above was washed using this method and
so was the one shown in the jig, so you can
see the results you get.
The next step in the
process is to cut the access port hole.
One note here:
Since the
introduction of the European Starling into this country, the purple martin has
suffered greatly from these fierce nesting competitors and with the advancement
of the starling into just about all of the martin's range, starling
resistant entrance holes of some sort are a must at any martin site. No, starlings are
not a problem everywhere and I've heard stories from folks that they've never
seen a starling at their martin site. However, for the majority of the country,
this is not so. Starlings have become a very big problem and if this is
the case at your site, then I highly recommend that SREH's be
used. Starlings must be
kept out of martin housing at all costs. For a number of reasons, if
starlings are present, then round
holes are no longer advisable and many of the responsible housing and plastic
gourd manufacturers are changing all their tooling over to them.
Some housing manufacturers still insist on using the old thoughts of using round holes on their
housing, but unfortunately, they are more interested in their bottom lines
rather than the martin's welfare. And best of all, the martins don't even hesitate
in using them once they get used to them. My entire site has been changed to crescents and trust me,
I stopped having starling problems from the very day I made the change from
round to crescent.
The following is
the procedure for adding your entrances and ports into your gourds.
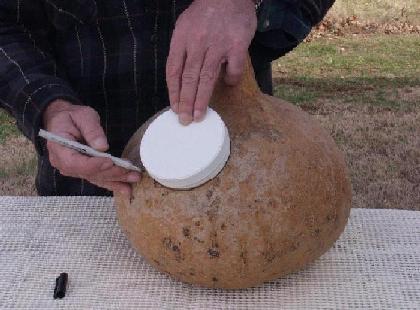
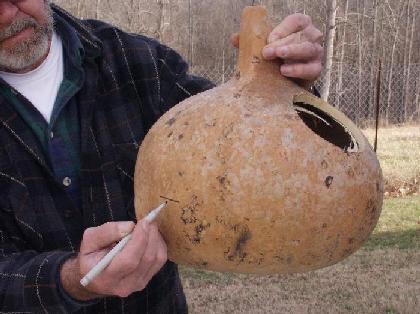
Select your gourd
and look at it. The first thing you need to do is decide where you want
your entrance hole. Maybe mark a small "X" on the gourd to mark
the spot. Then, 90 degrees to the right of it, (or left, if you're left
handed and want to use that side) and up high on the side of
the gourd, lay the port ring on the side of the gourd and draw an outline around
it on the gourd as shown.
Next, using a drill,
drill a 3/8" hole near the bottom line of the ring. This is used to
put your jigsaw blade thru to cut the ring out.
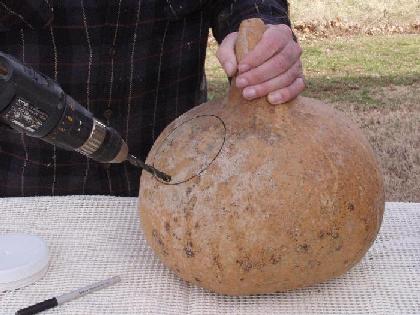
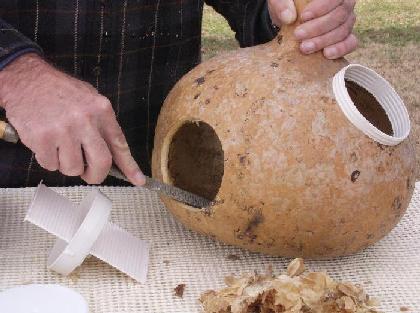
Next, using the
jigsaw, carefully cut out the access port hole.
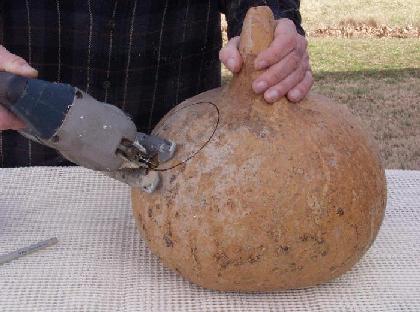
This is a good time to
check gourd thickness and make sure it's a good gourd to use for martins.
If poor quality and thin walled, it is suggested it not be used. However,
if that's all you have, then...
Next, we
want to establish the
equator of the bulb part of the gourd. To do this, hold the gourd by the
neck with two fingers, approximately where the wire will be placed and let it swing freely.
This will let the gourd find its natural
CG. Now, at the 'equator' of the bulb and where the entrance is going to be
placed, carefully draw a level line at this point in the center of where the
entrance hole is going to be placed. This will be the centerline of the
entrance port.
Again, hold the port
tube up to the gourd and center it over this line. Then, as before,
outline it with the marker.

And as before, drill and
carefully cut out the entrance hole.
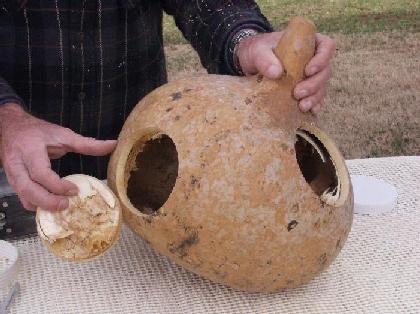
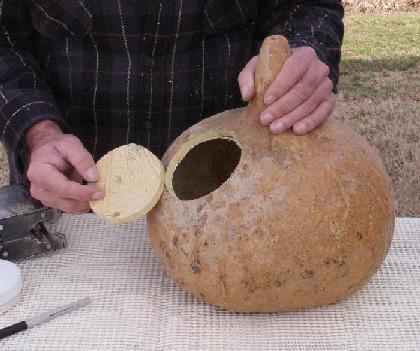
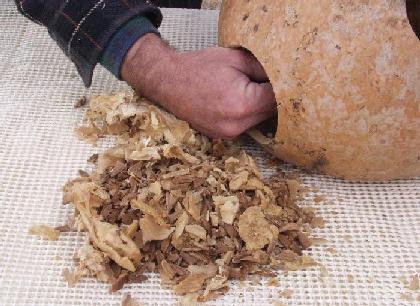
Now you need to get
the seeds and everything else out of the gourd. No need to scrape it
clean, just what ever you can get out with your hands. The 4" holes
make this very easy to do.
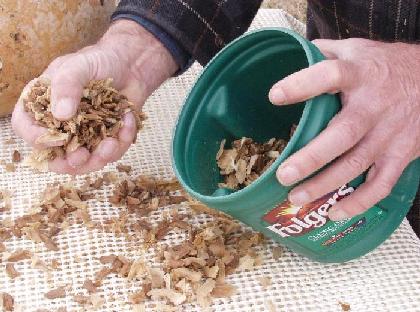
If you have a good
thick walled gourd or you plan to grow some, then these gourd seeds should be
saved in a good air tight container so they can be kept dry and safe from
varmits.
Take time to soak
them in Copper Sulfate.
If you plan to soak
your gourds in Copper Sulfate, then now is the time to do that. Copper
Sulfate is not a preservative, but instead is a fungicide and will kill all the
bacteria and fungi that instigate the rotting of a gourd. Soaking a gourd
in this mixture for about 30 minutes will kill all these fungi. Simply mix your Copper Sulfate, 1
pound to 5 gal of water in a container large enough to hold a couple of
gourds. I do a lot of them, so I use a large plastic garbage can. Stir it up good and then
submerge the gourds under the water for at least 20 minutes. I use a stick
stuck in one of the holes and push it down into the mixture. A weight tied to the other end of the
stick holds the gourd under the water. This one action makes them last much longer than if they were not
soaked at all.
After soaking for at
least 30 minutes, drain and then set your gourd aside for a day to fully dry. It
will have a greenish tint to it from the sulfate, but don't worry, it will be
all covered up by paint anyway. And no, you don't have to worry about the
green inside, the martins don't mind at all. Do not rinse them out to get
rid of any excess sulfate from the inside. This would be defeating the
purpose of soaking them in the first place. Copper Sulfate is not harmful
to the birds.
ANOTHER
NOTE:
Don't
just dump your Copper Sulfate out when you're done. It will kill plants,
and in fact, is used for that purpose in septic systems. If you're on city
sewer systems, then it can be discarded that way. But if you're out in the
country, make sure that where you dispose of it will not harm any plants or get
in any water systems.
I actually leave the top off my garbage can and cover it with a screen so
nothing can get into it and let the water evaporate.
The Copper Sulfate simply re-crystallizes for use at a later time simply by
adding water.
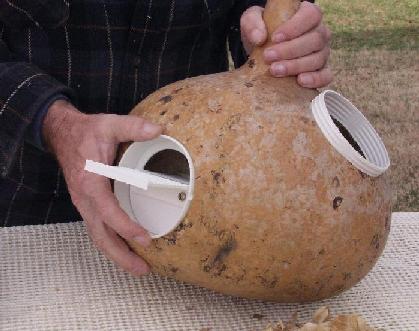
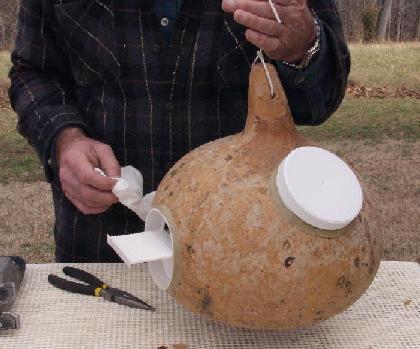
Now, with that said,
we can start
adding things to the gourd. First the port ring
can be positioned in the hole you cut for it. If it doesn't fit nice and
snug, or fit at all, then use your rasp and carefully work the gourd hole bigger
until it
does. Insert just a portion of the ring into the gourd, you don't want to
go too deep or there won't be any room to caulk and add the screw-on cap
afterwards. I like to cut my
holes a little on the small side on purpose and then carefully rasp the holes
out so that my parts fit nice and snug.
Note: I
assemble my entrance parts BEFORE I try to install them into the gourd. It
gives me a much better idea of how the porches set when the gourd is hung by the
neck. Note how the one shown is assembled. Porches should be level
with the crescent bottoms. This alone will frustrate any long legged
starling to no end. They just can't get down to the hole like a short
legged martin can.
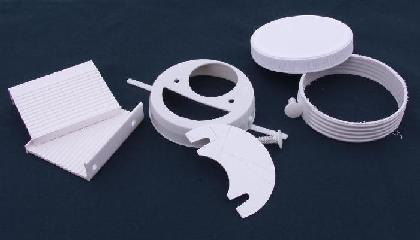
Entrance Hole
Assembly procedure:
Crescent on upper
side of ring.
Blank over round
hole.
Outer and inner
porches positioned level with the bottom of the crescent entrance hole.
Push pins (or screws
if used) thru the
holes from the outside, nuts to the inside.
If push pins are
used, squeeze to make a
good and snug assembly. If screws are used, tighten good and snug.
Now the same
procedure
can be done for the entrance hole assy. Fit this assy to
the entrance hole and if needed, rasp the hole to size. Once it fits the way you want it,
hang the gourd with your two fingers as before where the hanging hole would be and make sure the porches are setting
level. If not, adjust the entrance assy so that they are. A couple of things
here. Don't push the entrance assy all the way into the gourd. Leave
the rim sticking out about 1/4". This will allow for caulking.
And don't worry if it
isn't fitting the gourd perfect, they will be caulked closed anyway and
all gaps will be closed up.
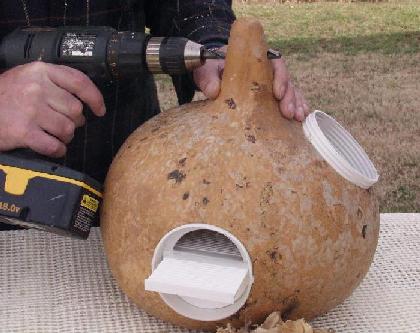
Now, let's drill the
hanging hole. Looking at the side of the gourd, drill it 90 degrees to the
entrance as shown, or if you like, parallel (front to back) with the entrance hole...it really
doesn't matter. I like mine to go from side to side, but some folks have
systems that require them to be front to back. It's your own preference or
requirement..
And while your at
it, drill at least 3 or 4 1/4" holes around the underside of the gourd for
drain holes. This will allow any water that does manage to get in to drain
out and keep the nest dry.
Now, using the
caulking gun and PPCA, carefully caulk around the edges of the access port and
the entrance assy as shown. Go slow and take your time. This stuff
can be messy, but if done carefully, very little clean up is needed. Also,
a wet soapy finger will help work this stuff without your getting it all over.
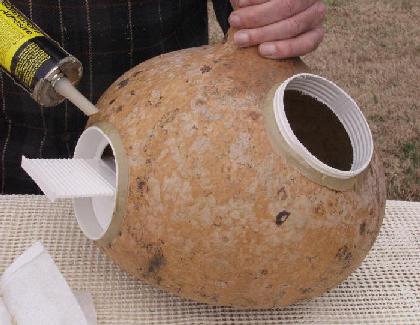
A paper towel
comes in handy to clean up any spots that are not wanted.
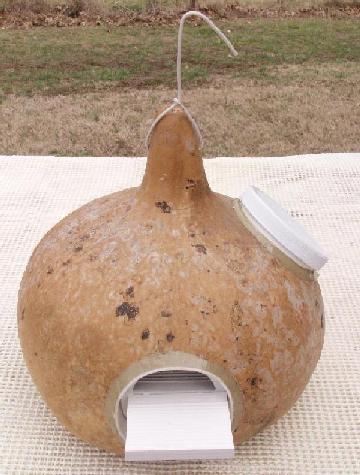
Also, this is a good
time to add the hanging wire and see if your gourd hangs nice and level.
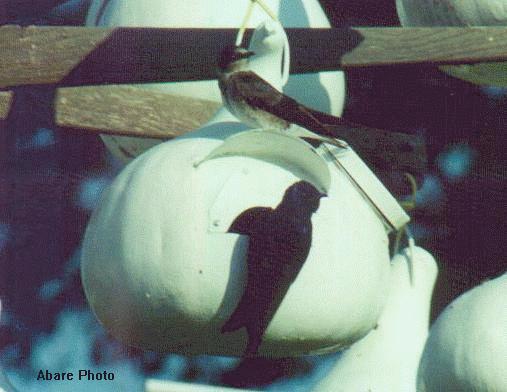
And finally, one
very nice martin gourd, ready to let sit and dry for about a day or two.
Don't rush. That only makes for a poor quality job. Let time do its
thing in drying and curing things.
Now once the
caulking
is fully dry, a 'heavy' coat of a good exterior wood primer can be
added. Again, let this dry fully. It needs to dry on the gourd so
the paint will stick to it later. And finally, 2 coats of a good exterior white
paint should be added to the gourd, with plenty of drying time in between
coats. Once dry, these gourds will make wonderful houses for purple
martins and if done correctly and taken care of in the off season, these gourds will last many
years.
As you'll no doubt
notice, I didn't add any form of canopy. Not needed! My reasons...
...the entrance is
already set back into the gourd...
...the entrance edge
is stuck out from the gourd by about 1/4" - 3/8" so any dripping dew
or light rain will
bypass the entrance.
...the martins can
now come out of their gourds and look skyward for any impending danger without
being hindered by a canopy. I feel that martins need to look up to spot
any impending danger such as hawks and I feel canopies hinder this and in fact,
I've removed them from any gourds that I add these entrances to just for that
reason alone.
A lot
of work, maybe. But then, this is supposed to be a hobby and is something
that can be enjoyed all year long. There's no reason to only enjoy the
martins when they are here. Working on their housing while they are gone
helps keep the interest in the hobby and building our anticipation of their
return and of course, that's what it's all about. Plus, working on them in
the off season doesn't require you to rush. You can take your time and do
a good quality job. And in the spring, when
you first pull that rack up with all these beautiful white gourds, the martins
will have a hard time resisting at least investigating them. And I
promise, when the martins do return, they'll thank you by filling your hard
worked gourds with lots of babies for you to enjoy for many years to come.
And, if you take them down and clean them out every year and place them some
place dry for the winter, they'll last you for 15 or 20 years if you start with
good thick walled gourds. I put mine in large plastic garbage bags and
hang them from the upstairs rafters of my shop. Every couple of 5 years, I
give them a new coat of paint and they look just like new all over again.
And, since the hard work is already done, I simply bring out my little air
compressor and spray paint the gourds. It takes me about 1 minute
per gourd and I actually hang them on the racks to dry.
Oh,
and one last thing about SREH entrance holes...
If
you've never used SREH entrance holes before, when
your martins see these type holes for the first time, they may seem perplexed at them
and apparently have problems negotiating them... DO NOT WORRY.
Martins are very fast learners and if your hole dimensions are correct, (which
they are right from the factory in this case) they will quickly learn to slip in and out of
these holes just as if they had been doing it all their lives, and in fact, some
of mine have. They've never seen any other type of hole. (This fear
of a landlord seeing them apparently not being able to get into these type holes
is known as 'SREH ANXIETY). Give them some time to figure them out and they'll do just fine.
If you have a good location and good housing, and they want in, then I promise,
they will get in. And I also
promise, once you see that a starling is not able to negotiate these holes and your
martins can, you'll never regret making the change.
EXTRAS:
The
following are a few pictures of items I use just in case they might help you
out.
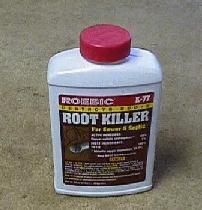
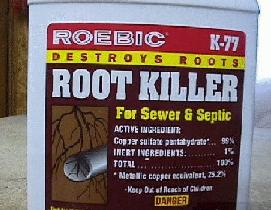
Copper
Sulfate
Copper
Sulfate is easily gotten. Just go to your local Wal-Mart or K-mart
plumbing section and get a product called ROEBIC root killer. As you can
see, it's 99% copper sulfate and one can is usually enough to work 16 to 20
gourds with some to spare.
Paint:
Dutch
Boy works for me, but if you have a favorite, then go for it...
This
page created and maintained by Chuck Abare

|
Woodside Gardens
The Registry of Nature Habitats  Copyright
  1999 -
All Rights Reserved 1999 -
All Rights Reserved
Last Updated:
| |
|