
Purple Martin Pages
![]() Requirements for martins
Requirements for martins
![]() The Martin Bio
Page
The Martin Bio
Page![]() The Habits
Page
The Habits
Page![]() Tips to
Attract Them
Tips to
Attract Them
![]() Nest
Checks
Nest
Checks
![]() T-14
Mounting
T-14
Mounting![]() Purple Martin
Housing
Purple Martin
Housing
Changing...
Round Holes In GourdsToStarling Resistant Entrance Holes
In the last few years there has been a major drive to find some way of eliminating European Starlings from Purple Martin nesting sites. Both martins and starlings are cavity nesting species and fiercely compete for nesting sites. The starling is around most of the year and begins nesting much earlier than the migratory martin, thus, when the martins return, the starlings have all the natural cavities taken up. However, we as humans supply housing for martins and therefore, they have a place to nest. Starlings that still don't have a nesting site are also looking for a place to nest and often will force their way into a martin site and literally take over a cavity regardless if a martin is interested in it or not. Because of their aggressive nature, they will simply take any compartment they want and once established, are just about impossible to remove. Often they will evict the martins and then simply take over the cavity. Starlings then start building their nest right over the original martin nest, even if there are eggs or young. Sometimes, they will kill the young and then toss them out and other times, they will build their nests right over them as if they weren't even there.
Many uninformed landlords have the belief that martins and starlings will get along just fine living in the same proximity of each other in the same house. This belief is very wrong and starlings should not be allowed to nest in martin housing. Martins are no match in a one on one encounter with starlings, especially within the confines of a cavity such as a martin house and the starling will win every time. Such encounters often result in the death of the martin.
Starlings nesting in a martin site will travel from compartment to compartment, maliciously breaking the eggs and killing the young of martins while the martins are away from the nest feeding. They do this to cut down on competition for nesting space between themselves and martins.
Also, if a starling is the first to begin nesting in a martin house, then they will drive any martins away that try to nest in the same house, thus resulting in no martins coming to your housing.
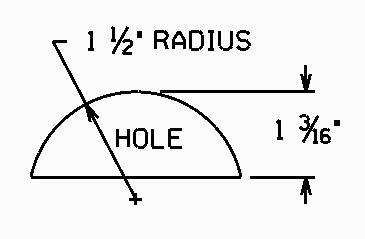
However, recently a man by the name of Charles McEwen from Moncton, New Brunswick, Canada, made a discovery that has made a large impact on the hobby of keeping purple martins. It's called the 'Crescent shaped' Starling Resistant Entrance Hole. The use of crescent shaped SREH's does a number of things to protect your martins while they are nesting in your housing, and for the most part, will end most of the problems having to do with starlings. In fact, the use of them will prevent the starling from even entering your martin housing.
Here are a few examples of why I say that:
-Purple Martins are able to negotiate crescent shaped SREH's. -European Starlings are not and thus can no longer get into your martin housing. -Not only starlings, but other possible threats to the martins are also eliminated. Some of these are: -The friendly little squirrels that just happen to like freshly laid eggs. -Blue Jays -Crows and Ravens -Screech Owls -Barred Owls -and the Great Horned Owl
Here's how it works. If you put a hole in your housing that measures exactly to the dimensions shown above, it will just about solve all your problems that you've had around your site dealing with the above list of predators. The dimensions are critical. Anything under 1 3/16 inches high and the martins can't get in, anything over and the starlings can. The two dimensions are critical and it takes a little longer to cut the holes, but if cut accurately to the dimensions, then it all works. The easiest way I've found to make them is to carefully make yourself a very accurate template from a flexible material and then use that to trace the lines onto your housing. Then, you simply have to cut it out using a jig saw and then finish it with a wood rasp.
Sound too good to be true. I thought so too, but this spring, I changed my entire site over to them and trust me, they work. I am no longer plagued by starlings. In fact, I can honestly say that since I made the switch over, not one starling has made it into my gourds. I have not lost one egg or a single chick to starlings. In fact, I watched for over 2 weeks while a pair of starlings tried to get into a gourd and no matter how hard they tried, they never made it in.
So, you're starting with a new site and have been told to start with round holes and then switch over after they have been established. Not so. New sites are being established every day and they are starting out with the crescents. I've even helped change over a number of sites to the SREH's and they too are now starling free. Therefore I strongly urge anyone that wants to keep martins, make the change and just watch for yourself. It won't be long before you realize your martins are safe within their gourds or houses and you will feel much better about it.
Materials/ tools required and some suggested sources for them:
A good sharp Utility knife (Wal-Mart, K-mart) A bunch of #6 x 1/2" lg Phillips Pan Head self tapping sheet metal screws. (Wal-Mart, K-mart, 100 to a pack) "Small" Keyhole saw or jigsaw A wood rasp with one side rounded (Wal-Mart) A pair of safety glasses. (A blade could snap and let's just be safe). A short scale or ruler that has graduations of 1/16" A small flat paint brush (If you use caulking) DAP caulking with silicone added. (Brilliant white) A caulking gun
The following are the procedures for making and cutting these holes in gourds that already have round holes in them.
Materials/ tools required and possible source for them:
Some Polystyrene or Polypropylene (source given below) A good sharp Utility knife (Wal-Mart, K-mart) A bunch of #6 x 1/2" lg Phillips Pan Head self tapping sheet metal screws. (Wal-Mart, K-mart, 100 to a pack) 1/16" and 1/8" drill bits and a drill "Small" Keyhole saw or jigsaw with a scroll cutting blade A small wood rasp with one side rounded Flexible straight edge (I used a 6" piece of the Styrene) A pair of safety glasses. (A blade could snap and let's just be safe) A short scale or ruler that has graduations of 1/16" White Latex Caulking, (Optional) A small flat paint brush (If you use caulking)
First, you have to obtain some material to make the "add-ons" from. The thickness for these add-ons can be .040" to .060" (approximately 1/16 inch thick) and if possible, the color you want is white, (of course). I found that the easiest material to use was the small thin somewhat square plastic household trash cans sold at Wal-mart and K-mart. They are very 'flexible' and easily cut with a sharp utility knife. Once you get your trash can, simply cut out all the flat sections with your knife and you're ready to begin.
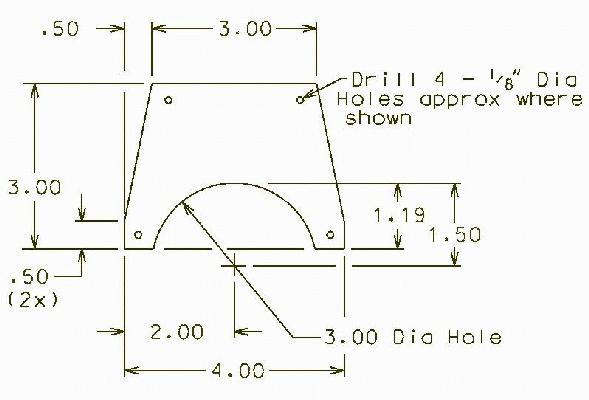
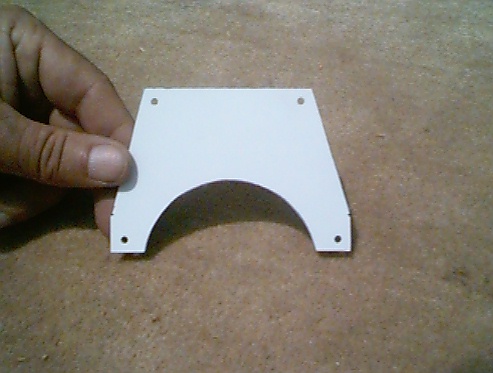
Here's how I did mine: First, a pattern of a crescent shaped SREH "add-on" will have to be made. (Use the drawing below). I made mine from a piece of the plastic I cut out of my trash can. Take your time making it. The outside dimensions don't have to be that accurate, but it will be the pattern for all your add-ons so you want it to be pretty good. The hole portion however, has to be pretty accurate. It also has to be accurate because if it's too big, the starlings can get in and if it's too small, the martins can't.
You should end up with a piece that looks like this.
Next, I laid the pattern on my plastic, traced it with a thin marker and simply cut it out by following the lines using the ‘utility’ knife. I then drilled the 1/8" holes to screw it onto my gourds. (One in each of the 4 corners approx as shown).
Now, gourd prep.
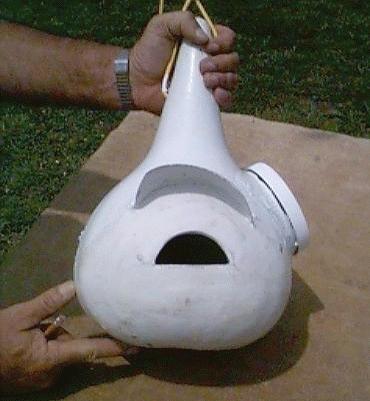
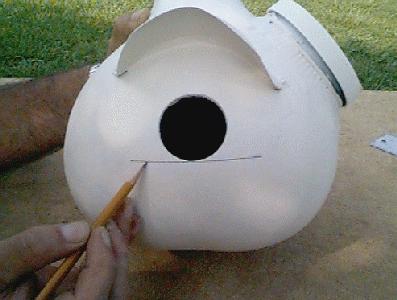
Take a gourd that has a round hole in it. Lay your flexible straight edge even with the bottom of the hole so that it will be parallel with the ground when it's hanging. Using a ‘sharp’ pencil, draw a horizontal line, even with the bottom of the round hole. About 3 inches either side of the hole will be plenty long enough.
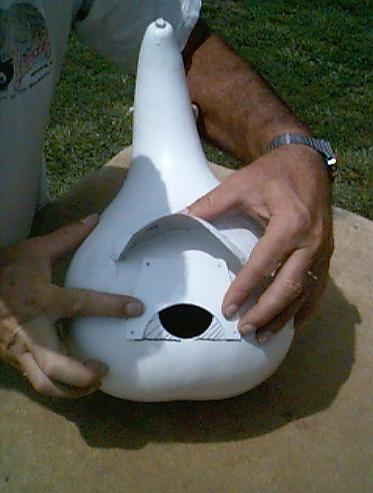
Now, lay your freshly cut out ‘add-on’ over the hole with the bottom of the piece setting on the line and trace the inside curvature of the crescent on the gourd. Only part of it will actually be on the gourd, the rest is hole. Using a jig saw or even a small keyhole saw, start at the hole and work your way out in both directions being very careful to keep the line very straight. Next, remove the part of the gourd that you drew the line around.
Now, lay your SREH on the gourd with the bottom setting exactly on the horizontal line you cut and centered over the hole. Pre-drill a 1/16" hole in the gourd where the lower left screw hole is in the pattern. Add a 6-32 x ˝” long Phillips self threading screw. Now that one screw is in place, you can maneuver the piece around more easily. Level the other side of the piece to the horizontal cut. Now, use the scale and check your measurement. It has to be 1 3/16" and is easy to achieve by just twisting the add-on. Now holding the piece in place, pre-drill and add the right screw. Complete the assembly by pre-drilling and adding the two top screws. Double check your opening dimension, it's important. Now if necessary, using your knife or round edge of your rasp, clean up the edges of the gourd near the half moon so that the crescent is accurate. If you need to do a little fine tuning, use your wood rasp and file away the required material.
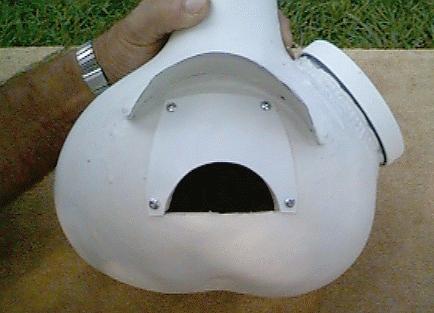
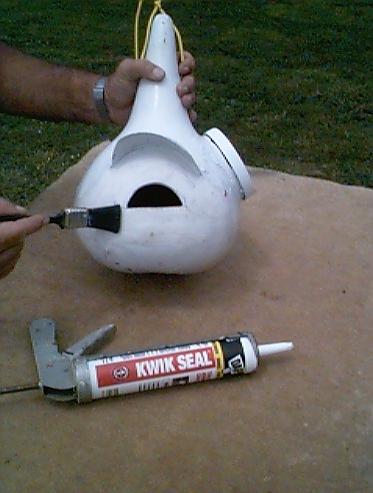
I like the clean look, so I added some DAP Kwik Seal (white… 15 year... in the red tube… no added silicone… dries faster… Wal-Mart brand), and made the front of the gourd look like there wasn't even an add-on there. Apply the caulking and then with a small paint brush, smooth it out to make it look good. I even put a little under the hole for their feet to grab onto. I just think it gives a better finished look. Then, let it dry over night.
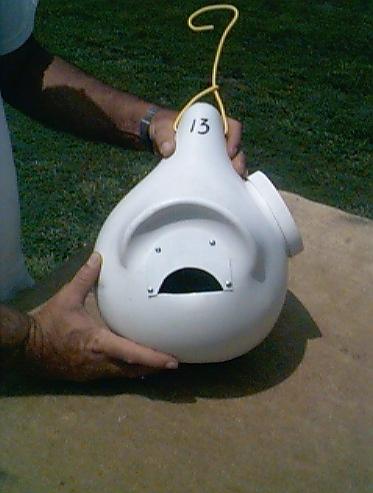
What you end up with is the following. A good looking gourd that is starling resistant and just waiting to be filled with baby martins.
The reason I left the bottom of the add-on piece open was I wanted the martins to have natural gourd surface for their feet to land and cling to. Just my own little quirk, but I feel they like the feel of natural better. It also makes it easier to add it to a spherical surface.
Now, one last thing, if you don’t want to spend the time making them from plastic, Frank Prekup http://www.atlanticbreezes.com/pprekup.htm has a die that punches these crescent shaped SREH’s out of thin aluminum and they are ‘very accurate’ and I’m sure he could be persuaded to make these for you, and yes, it would work just as well as the plastic and the caulking would fill all around it and make it look just like my plastic versions. You would just have to make sure all the sharp edges were well covered with caulk so neither you nor your birds would be hurt. A claw could become entangled in a loose edge. I don’t know what Franks prices would be, but I’m sure he would come up with something fair.
OH, and one last thing. This will also work for any type of housing you want to change. Wooden houses and plastic gourds alike.
Plastic
Gourds
The above gourd is made by Natureline. Although they don't yet have the crescent blanks, you can get a solid blank and then cut the crescent into it yourself. It really isn't that hard. Most of the material can be drilled away using a 3/8" drill and then use a utility knife to trim away the rest to form the crescent.
Likewise,
the SuperGourd with round holes and sold by the PMCA can be changed
using the same technique as shown above. The add-on should be
rounded on top to fit the curvature of the SuperGourd canopy. It
works exactly the same and the birds hardly even notice. However,
the caulking doesn't stick to the plastics very well, but if the job
is done neatly enough, it really isn't needed.
Back to Chuck's Purple Martin
Page

|


 1999 -
All Rights Reserved
1999 -
All Rights Reserved