Growing Gourds
The
following are a few tips as to how to grow gourds. Although the
information is intended for 'birdhouse gourds', (Lagenaria), the
basic information will work for just about any type of gourd or vine
plant.
First, there are a few basic requirements that must be
met before attempting to grow gourds of any kind with any real
success. Gourds of all types require a lot of sun, water and a long
spell of warm weather. Lagenaria, or 'Bird House' gourds will
need about 150 to 180 growing days in order to fully mature to 9" or
10" gourds. Gourds also need one thing that we wouldn't
normally think about. Gourds need room, lots of room. Depending on
the type, the vines often obtain lengths of 30' or more. I've
personally seen them over 50 feet long. They can either be trellised
or left to run on the ground, but I've found my best results are to
simply let them go on the ground, changing the direction of the vine
if necessary. Good soil is obviously a must for any plant to grow,
but there are also a few other things that can be done to give them
a helping hand.
Planting in Hills
One of
the most popular methods for growing "any" plants from the vine
family is to plant them in "hills". To do this, dig a hole about a
foot deep and two feet in diameter in an area where it will receive
plenty of sun and water. Then, you fill the hole about 1/4 to 1/2
way with cow manure. This can be found at any Wal-Mart or Kmart
garden center or any garden shop. You may even know a farmer that
will give you some. Good quality 'humus' will also work very well.
Next, cover the manure with about 3 or 4 inches of dirt and space
from about 6 to a dozen seeds around the 'hill' and cover them up.
As they grow, their roots go down into the manure and are thus self
fertilizing. Once they are well started, say about 2 or 3 leaves
each, thin down to the best 2 or 3 plants. With good sun and water,
they will soon begin spreading their vines. Just beware, the vines
will soon overtake a large area, so don't place the "hills" too
close together. It is not uncommon for the vines of the larger gourd
species to easily reach 20, 25, even 30 feet in length. I assume
that a plant can handle and grow 2 good gourds each, so, with that
in mind, you could expect 20 gourds from 10 plants, depending on
your local and length of growing season. Just remember, the more
gourds per plant, the smaller they will be. And depending on
the pollination, some will have gourds, some won't. More
about this later.
If the hill is not an option, another trick
is to plant them and get them started growing. Then, take a 5 gallon
bucket and put some cow manure in the bottom of it. For obvious
reasons, put this where it will be well out of the way of humans.
About 1/4 bucket of it should do just fine. Then fill the bucket to
about 3/4 full with water and let it set. Occasionally, stir the
'sludge' around with a stick. Then, you can take a watering pan of
some sort and every once in awhile, 'water' your gourd plants with
this 'brine'. The 'watering' should take place well after the heat
of the day is gone. I do mine late in the evening after the main
heat is down. Early morning works good also. Then, you can add a
little manure and water to the bucket and start over. Don't over do
it. About once every couple of weeks works just fine. Normal
watering should take place in between times.
Something
different.
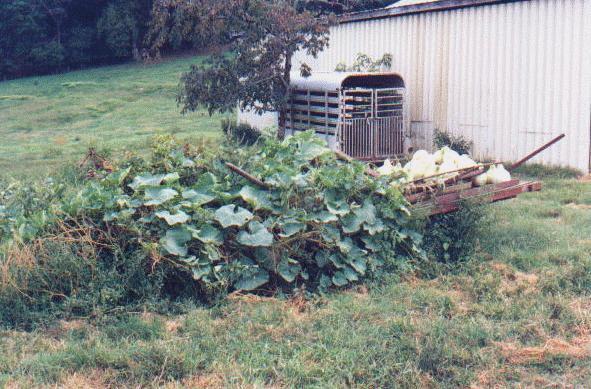
It's
been said that gourds 'thrive on neglect'. In other words, plant
them and leave them alone. Believe it or not, this is what one of my
farmer friends does to get his gourds. He goes out near an old wagon
that sits out in the open where it gets plenty of sun. He then
pushes some seeds into the ground around it and leaves them alone
all summer. The gourds grow all around and up onto the old wagon. At
the end of the year, around the time the growing season has come to
an end, or the weather has turned cool, he picks his gourds and sets
them on the wagon to dry. He leaves them there until I pick them up
and bring them home to work them into Purple Martin houses. This
works for him. Every year he has 30 to 50 beautiful gourds that he
can either use or give away to be used for the martins.
My
Point
I guess
what I'm trying to say here is that there are no special rules that
have to be followed with growing gourds. They don't have to be
coddled and fretted over. Just plant the seeds in a good place out
in the open and give then a chance to do their thing. Just be
prepared. With good soil, lots of sun and regular watering, the
vines will grow to a long length and will overtake anything within
20 to 30 feet. They love chain link fences, a special made trellis,
or even an old wagon, just as well as open gardens, however, I
prefer to leave mine on the ground. During the growing season,
I walk through the plants and set the gourds 'up'. That way, I
get good uniformity in shape and they all look like what I want as a
finished product when they are done growing. This standing
them up often gives the neck a little bend to it and it also makes
the 'stem' curl outward. When I make them into bird houses, I
cut the stem about 2 inches long and cut the entrance hold directly
under this stem. That way, the martins have a little something
extra to perch on while guarding their gourd.
Some
growing tips
We
live in the Northern part of the country and summers here are short.
Is there something we can do to help our gourds get a head
start?
If you live in the northern part of the
country where the growing season is shorter, one thing that can be
done is to start the seeds outdoors in what is called a 'frame' or
indoors in trays before the growing season and then transplanting
the young plants outside on the hills or rows when the weather is
warm enough to plant. This will give your plants a good head start
on the growing season. Here's a short description of starting gourd
seeds inside the house or outside in a 'cold frame'. Smaller
versions for use inside of a house are often called 'flats'. Small
flats built for use inside your house in a window should not have a
top on them. The heat will quickly kill the young plants.
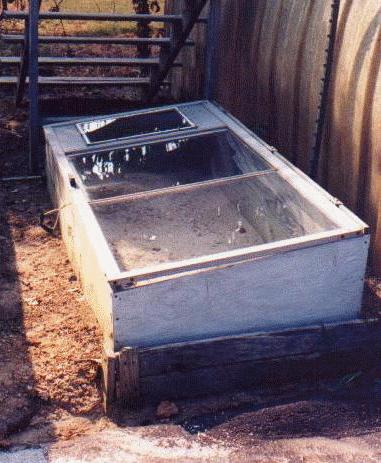
The
best method is to start by making a 'frame' or small hothouse
outside. This is done by nailing some boards together to make a
small frame and lay it on the ground in a good sunny area. The
dimensions for the frame are approximately 30" by 60" by about 12"
high. (The dimensions given are basic and you can make yours to your
own dimensions).
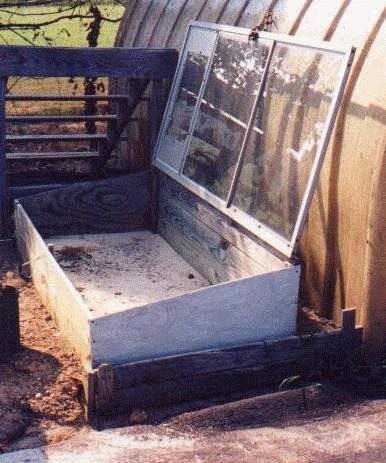
Next, you need to make a door that will fit
the top of your frame. This door will contain either clear plastic
sheathing or glass, your preference. This door has to be removable
or better yet, hinge in the rear so you have access to the frame.
(An old aluminum door with glass in it will work just fine). If you
make a good one from treated lumber, it will last you for years, and
you could start any kind of transplantable plant you like in
it.
Now fill the frame about half way to the top with a good
potting medium such as humus. Make sure that you have at least 6"
between the top of the dirt and the door or your young plants will
grow up into the glass. 9" is even better.
Once the
temperature outside reaches a reasonable level, say in the 40's
during the day, you can consider planting the seeds in the frame.
You don't want to do it when the temps are freezing during the day.
It will be even colder at night and a hard freeze can be deadly to
young plants or propagating seeds. The seeds should be planted about
4 or 5 weeks before regular planting times in your area.
The
seeds should be planted about 3 inches apart in the soil in the
frame, moisten with a little water and then close the top. Then sit
back and wait. Within 6 to 10 days, the seeds should be sprouting
and the young shoots should start poking their heads
out.
A couple of tips here. Plant your seeds far
enough apart so when you dig them up to transplant them, you can get
a good handful of the potting medium. You want to disturb the roots
as little as possible. And you will want to put this handful of
medium right into the hole you dug to transplant them. It will help
them get a better start. A second thing that can be done is to plant
one seed each in small individual 2" peat pots. Then, these can be
removed when it's time to plant and the start will have little or no
disturbance at all to its roots.
Also, set a thermometer in
the frame where it will not get direct sunlight so you can keep an
eye on the temperature inside the frame. If it gets too hot, say
anything over 100 degrees, then you'll want to prop the door open an
inch or two to let the hot air out and some cool air in. On the
colder days, you may not need to open it at all, but as the
temperature climbs outside, it will also climb inside the frame. The
temp can be controlled a little by the amount the door is propped
open.
One other thing. The larger the frame is, the easier it
is to control the temperature. That's why the minimum size of the
frame should be 30" x 60". Smaller than that, and the temperature
fluctuates too quickly to control accurately.
Another
tip
Make
some humus. Humus is very good to start your seeds in and is
easy to make. It's nothing more than compost. I have a
couple of large bins of it going all the time... (My wife is a
flower and garden nut plus it's great in the raised beds). A
compost pile is easily made by driving a couple of posts in the
ground and then nailing a couple of 4 x 8 sheets of 'treated'
plywood to the posts so that you create a box. Then,
throughout the year, throw your grass clippings, raked leaves or any
other thing that was growing, but is now and for what ever reason,
dug up and of no value to you any more. Throw all this
material in the box and let it set. Use a fork and every
couple of months, move it around, mixing the contents. In dry
spells, I turn the hose on it to keep it moist. You'll be
surprised at how quick you can make some great humus to grow things
in. (Just don't tell your wife about it if she's a flower
nut).
How
close should I plant my seeds or young plants in the
hills?
Don't put your seeds real close together. If
you make a 2 foot diameter hill, spread about 6 seeds out around the
hill. Then, when they are about 6 inches tall, cull down to the best
2 or 3 plants. If you are transplanting young plants, then I would
put only 3 plants equally spaced around the hill.
If you're
planting in rows or some other method, plant your seeds or young
plants at least 3 feet apart. Remember, these plants are going to
get rather large as they grow. 36" spacing is a minimum because the
plants will need to have room to gather nourishment from the soil
and their roots will need room to spread out. I space mine to
at least 10 feet at planting.
I want to grow my gourds in rows. Will
that work OK?
Absolutely. That's how I do it. I grow mine
with a friend and, since he's retired, he starts some seeds in the
spring. We then get together and plant the young plants one
Saturday morning. From then on, we just let them go. I
prefer the rows because it allows the vines to spread out and I can
go back and 'trim' the vines if I like, plus, I can stand them up
while they're growing so I get the shapes I want.
The vines from my plants are getting too long
for me to get between the rows with my cultivator. What do I
do?
Nothing. Just stop cultivating and let them go.
Gourds have a very shallow root system and once the vines are
established, they really don't need any more tending. A good healthy
gourd plant will overtake other vegetation and usually the leaves
will be thick enough that they will prevent the sun from getting to
other plants and thus, they can't grow.
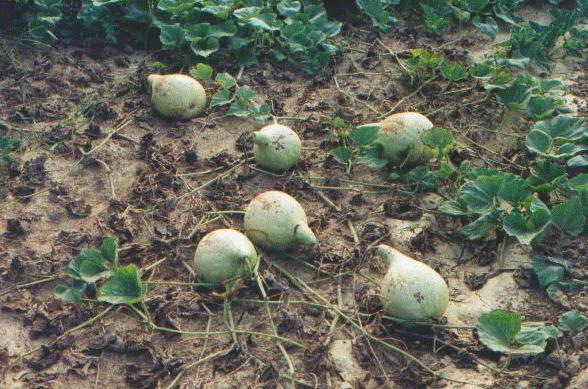
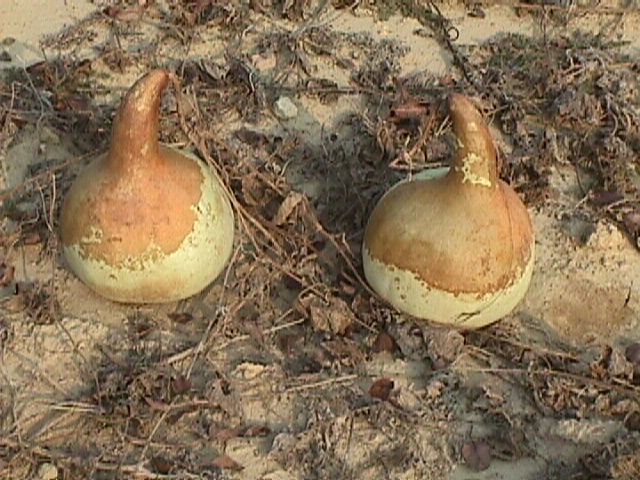
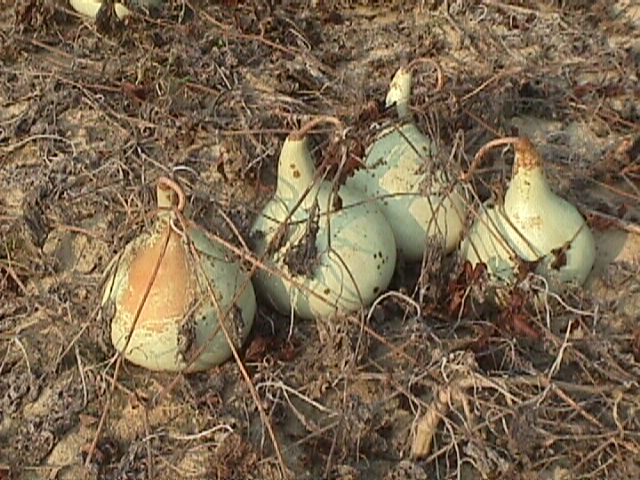
My gourds are
sitting on the bare ground. Is this bad for them?
Not
at all. As long as the gourds are green and growing, there is no
problem with them sitting on the ground and in fact, they will be
just fine for a long time without any threat of decay. It
would take a couple of years for the gourd to rot. However, about
half way through the season, I like to stand mine up so they will
'fill out evenly' and have nice form during the growing
process. I like a small curve in my gourd necks (like shown
below) and standing them up while growing accomplishes this.
If they are hung from a trellis of some sort, then the necks will be
very straight. Also, since I use my gourds for martin housing,
I drill them so that the neck sticks out when hung and the martins
love to sit on them while protecting their holes.
.
I have a lot of gourds on my plants,
but they're not very big. How can I get my plants to produce bigger
ones?
Like anything else, there is only so much food
one plant can produce for its fruit. Gourd plants are no different.
Here's a tip that will help produce fewer, but larger
gourds.
Gourd plants produce one main vine. This is where you
will find the male blossoms, (staminate), and of course, this is
where the male pollen comes from for pollination. Then, at
intervals, this main vine produces side vines, or 'laterals'. This
is where the female blossoms, (pistillate) reside and where you will
find the gourds being produced. Watch your plant as it grows. During
bloom, you should see small gourds starting to grow on the side
vines. If you set out to produce a specific amount of gourds per
plant, for instance, 4 or 6 gourds per plant, then you want to
remove any unused vines that are remaining.
Be
careful, don't cut off the vines with the gourds on them.
Cutting back your gourd vines is done like this.
Find the
end of a vine. Now, follow it back to its first
junction. If nothing is growing on it, then simply clip it at
the junction using a pair of pruning shears. Again, find
another end, follow it to the junction and clip it.
Continue this until a good bunch of the 'excess' vines are
removed. By trimming from the tips of the vines, you won't
make a mistake and cut the wrong vines with the gourds on
them. When you come to a gourd that you want to keep, clip the
vine leaving about a foot or two of extra vine. I usually
leave one or two extra leaves. The object is to leave about
half the original vines on the plants. Also, to get good gourd
size and growth, I rarely leave more than 2 or 3 gourds on a single
plant. I have a lot of room and sometimes, I find only one or
two gourds that I feel are worth keeping. In this case, I
remove all the others so that all the nutrients will go to
these.
Once you
have your magic number of gourds established, you can pinch or cut
any remaining blooms and gourds from the vines. Do this by simply
clipping them near the vine and discarding them. This will force the
plant to put all its food into the remaining vines and gourds. This
will usually produce only a few, but very large gourds. And, if you
stop to think about it, if 1 plant is able to produce 3 gourds and
you have 10 plants, that will make 30 large gourds, and that's a lot
of gourds.
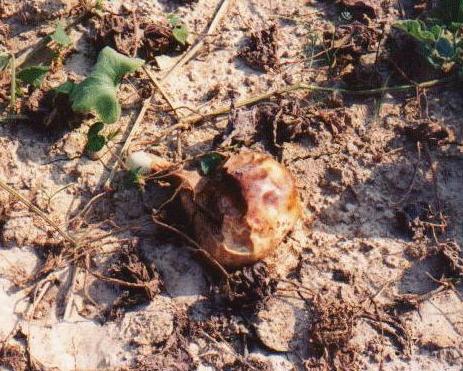
One other note: Sometimes, for whatever
reason, a gourd will shrivel up and die. Don't let it bother you.
It's just one of those things that happens in nature and you really
can't do anything about it. It might have been diseased or a
borer might have gotten to it, and besides, if it was defective,
it's better that it did rot.
Are
there any other ways to fertilize my gourds?
Yes. If
you don't want to get into the cow manure, you could water your
plants down with a fertilizer called "Miracle Grow". But this
should only be used to get your plants started.
Miracle Grow produces 'foliage' and that helps your plants
get started. All you do is mix this per the instructions on
the can and then water your plants with it. Also, Miracle Grow
should only be used one time. It was developed to create
greenery and you'll quickly find out you don't need that with
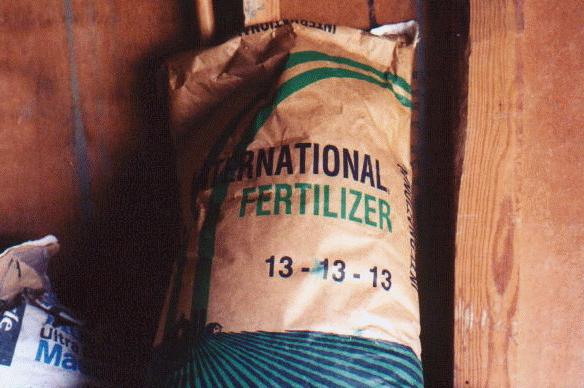
gourds. Also, using Miracle Grow is fine if you only have a
few plants, but probably one of the easiest ways to fertilize your
gourds is to throw a hand full of triple 13, (13-13-13) on them and
let them go. Don't need a lot, just a hand full per hill or spread
out down the rows is plenty. Once all of it has been absorbed by the
plants, then add another handful. Probably a couple 3 times a
year.
Also,
remember this, gourds 'need' potash. It's what makes
the gourds large and thick walled. Do not be afraid to make
sure that the plants get plenty of potash.
What
is the easiest way to tell how big my gourds
are?
Here's about the easiest way I've found to tell
the size of your gourds. Purchase or find a "tailors' tape measure".
It's made of cloth and is very flexible and will go around a gourd
with ease, and, you can keep it in your pocket. Measure the gourd
around its largest diameter, or the bulb. If it reads 27", then it
is big enough to use for Purple Martins. Divide the number that you
get by 3 and that will give you the diameter of the gourd. IE, 27" /
3 = 9" (remember from High School math, the circumference of a
circle divided by "Pi" (3.1417) will give its diameter. Using 3 even
is close enough for our purposes and it's easier than using a
calculator). So, if your gourd measures 27" or larger, it will work
just fine for martins. And remember, the bigger, the better.

How
big should the gourds be to use for martin houses?
I
would consider 8" to be the absolute minimum size gourd to
use for purple martins. Anything smaller is not fit for martin
use. I personally feel gourds should be at least 10" in
diameter at the bulb, or 30" on your tape measure. Martins are the
largest member of the swallow family and can raise as many as 7
young. Anything smaller than 8" is too small and the birds will be
much too crowded. I know that not all gourds can be that big,
but try to make them as large as possible. Start your housing
with as many big 10 inchers' as you can and then add to them each
year. And remember, these are things of nature and they won't
always be perfect. We are looking for approximations that will get
us in the general area of size and shape. Gourds will grow to
any number of different sizes and shapes and some of them will be
rather interesting. It's your choice which ones you will want
to use as martin houses.
HELP!!! I bought some seeds
and the gourds don't look like the ones I thought I was getting.
What happened?
Welcome to the world of gourds. Most
of the gourd family will cross pollinate. When a professional grower
plants his crop, he tries to keep the different species segregated,
but he's not always successful. The natural pollinators such as
honeybees and moths, are able to fly from crop to crop looking for
the nectar and pollen. They don't care what type of flower it is,
just that it has nectar and pollen. Thus, they fly from flower to
flower, crossing over the lines of distinction the grower intended.
Bingo, you have cross pollination. Now the stage is set for a
possible surprise. Granted, you have seeds, but you won't know for
positive what you're going to have until they grow the following
year. Most of the time you will get what is pictured on the package,
but also, be prepared to be surprised.
Why
is it that some of my flowers have small gourds under them and
others don't?
The
difference is, the ones 'without' the little gourds are
'male' blossoms and the ones 'with' are
'females'. If pollinated, the little gourds under the
female blossoms will turn into actual gourds. If not
pollinated, then they will simply shrivel up and die.
Why
is it I never see any honeybees around my blossoms? I thought
they were supposed to pollinate my gourd blossoms.
Actually,
95% of the pollinating of gourds is done after dusk has set
in. Honeybees will visit your flowers occasionally, but if you
notice, the flowers are usually closed during the day. Then,
just before dark, they open up. This is usually when your
gourds are pollinated, and although not always, it's usually the
Sphinx Moths that do the pollinating. (They are also known as
Hummingbird Moths). These are very large moths and are much
better adapted to pollinating large gourd flowers than the little
honeybee. When your gourds are in full bloom check them around
dark and you should notice one or two of them around. If not,
then you may have to pollinate them by hand.
OK,
so how do I pollinate them by hand?
Hand
pollinating is done by taking a small pointed artists brush and once
the flowers are open, dipping it into the blossoms, alternating from
male to female and so on. Remember, the females have the
little gourds under them. This should be done when there are a
lot of blossoms so you get a good cross of pollen.
And
if I don't hand pollinate...?
If the
blooms don't get pollinated, then the little gourds under the female
blossoms will soon rot and fall off. And if this happens, then
you won't get any gourds.
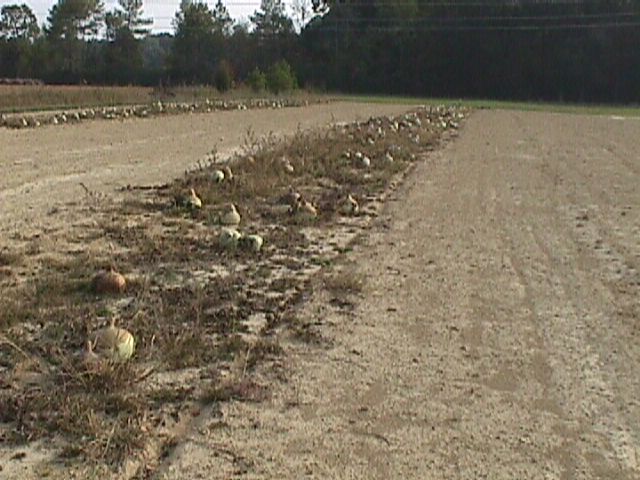
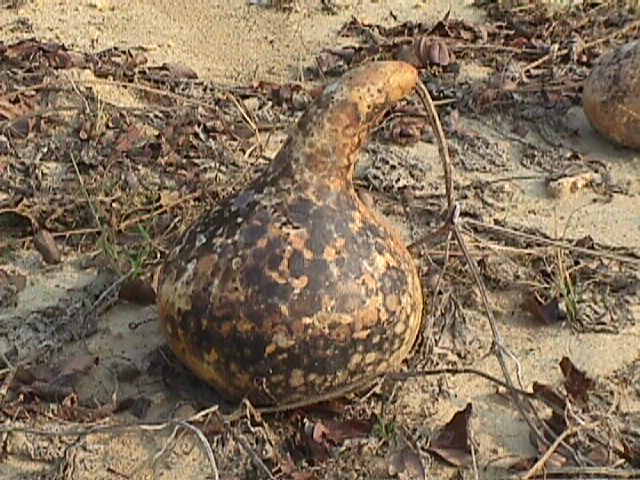
My
vines are wilting. The leaves are turning brown and dieing and
I can't seem to find anything wrong with them.
That's
because there's probably nothing wrong. Actually, this is very
normal. The first leaves to grow on the vines are the first
ones to die. As your vines get longer, the leaves out towards
the growing vines are nice and green, but as the vine grows, the
leaves back near the main plant roots turn brown, shrivel up and
die. They are no longer needed so the plant does away with
them. If you notice the opening picture on this page, that's
what has happened and all that's left is the live vines feeding the
gourds.
How
will I know when my gourds are ready to pick.
That's
easy. Leave them right in the field, attached to the
vines. Let everything, including them, turn brown and dry
up. No, rain and cold won't bother them. Once
this happens pick the gourd up and shake it. If it's dry then
the seeds should rattle inside. Now you can use your pruning
shears and clip the vine leaving about 2 inches of vine on the
gourd. That's all there is to it. They are now ready to
be made into martin houses.
Free Seeds
A few more links
on growing gourds
Growing Gourds By Jonathan R.
Schultheis, Extension Horticultural Specialist
Abby's Gourd Page Some gourd
information by Abby Lane
Back
to The Gourd Page
Back to Chuck's Purple Martin
Page
This page created
and maintained
by Chuck Abare

|
Woodside Gardens
The Registry of Nature Habitats  Copyright
  1999 -
All Rights Reserved 1999 -
All Rights Reserved
Last Updated:
| |